How
to
RADIOTRACK CHICKADEES
or other small birds
Quicklinks: Purpose
| Transmitters | Making a
harness | Attaching a harness
Instructions by Dan Mennill, Last updated 2001
|
Purpose
Beat
Naef-Daenzer
ran a series of comprehensive tials to test the effects of
radiotransmitters
on a variety of tit species in the 1990s. He concluded that even
the smallest tits could carry up to 5% of their weight (Naef-Daenzer
1993 & 1994). A 5% threshhold has become the general rule
for attaching radio transmitters to birds. Although
radiotelemetry
can provide very important data on bird behaviour it presents a great
challenge
to researchers who must balance this weight restriction against battery
life and seek a non-invasive attachment technique.
In my
research
I use radiotelemetry to track female Black-capped Chickadees (average
weight
10.8 grams) for a few days during the females' fertile period.
Based
on good advice from other researchers I found chickadee telemetry can
be
a relatively easy and rewarding technique. This page is intended
to pass along my experiences with chickadee telemetry to other
researchers
interested in radiotracking small passerines.
|
Female
black-capped
chickadee with
LB-2 transmitter
|
Transmitters
I use
Holohil
LB-2 transmitters, which weigh 0.5 grams. I do not use attachment
tubes to minimize transmitter weight. The people at Holohil are
friendly
and knowledgable and they provide a good product, although there is
often
a backlog of orders because their product is in high demand. I
recommend
Holohil very highly.
|
Harnesses
I use a
figure-eight style leg
harness
(Rappole & Tipton 1991) to
attach LB-2
transmitters
to chickadees. This harness works as a backpack where the "loops"
of the figure-eight wrap around the bird's legs while the transmitter
sits
across the bird's back. I know this harness has been used
succesfully
on White-crowned Sparrows (Zonotrichia leucophrys) and Hooded
Warblers
(Wilsonia citrina) and with moderate success on Least
Flycatchers
(Empidonax minimus).
How
to make the figure-eight harness
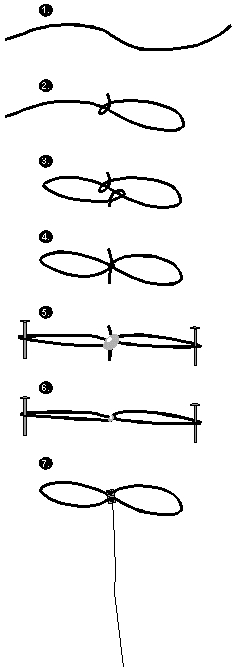
(Follow the
diagram at right)
1.) Cut a short piece
of beading
cord elastic. This stretchy elastic is available at sewing
shops.
Use the thin stuff. (The perfect thickness of beading cord
elastic
is what they use to make candy necklaces.)
2.) Tie one end to the
middle
using a loose granny knot to create one loop.
3.) Tie the other end
to
the middle (but inside the first loop so the knots can pull on each
other)
to create a second loop, and thus a figure eight.
4.) While the knots are
still
loose, adjust the lengths of the loops so that the loops are the exact
same size. Then tighten the knots. See below for
information
on harness size specific to Black-capped Cickadees.
5.) Strech the figure
eight
over two nails or pegs. Don't over-stretch the harness, just
stretch
it to the tightness it would have if it were fitted on a bird.
Cover
the entire knot with a dab of 5-minute epoxy. Let it dry
overnight
while suspended around the pegs.
6.) After the epoxy is
solid,
trim the excess beading cord elastic. Using a pocket knife
and sandpaper, scrape away all excess epoxy. Try to get a
super-thin layer of epoxy around the knot. Weigh the harness when
you're
done to find out if you've shaved off enough epoxy. Use very
fine-grain
sandpaper to smooth the side of the epoxy-knot that will be next to the
bird's skin. Keep the other side of the epoxy-knot rough.
7.) Glue the
transmitter
to the rough side of the epoxy-knot using super-glue. You
can do this before you activate the transmitter, but be careful not to
glue the leads together. Store the harness in its relaxed state
(i.e.
not on the pegs). I think the two most important
steps in
the above technique are (i.) using thin beading cord elastic
and
(ii.) while the glue is drying, stretching the harness as
though
it were fitted on a bird. Special thanks to Scott MacDougall-Shackleton
for telling me about these two important steps.
|

|
|
Harness
size
Despite
what you may have heard,
size
does matter. Here are the measurements that I found worked best
for
Black-capped Chickadees. With the figure eight laying relaxed on a
table:
3.0 cm across the whole figure eight. Stretching the figure eight
between
two pegs just enough so that it doesn't sag: ~1.5 cm across
the inside of each loop, ~3.5 cm across the whole figure eight. Stretching
the figure eight so much that you think you're going to stretch-out the
elastic: 6.5 cm across the whole figure eight.
Back
to top
Attaching
the harness to birds
The beauty of
the
figure-eight
leg harness is that you can put it on and take it off easily and you
can
re-use the same transmitter/harness on successive subjects. Once
you get some practice, you can put a harness on a bird in a minute or
two
and you don't have to cut any feathers or wait for glue to dry in the
field.
While holding the
bird
upside down in the banding grip, stick one of the bird's legs through a
loop. (Make sure that the antenna of the transmitter/harness will
point down the bird's tail!) Using a blunt-end (I use a really
dull
pencil), gently ease the first loop up on the bird's first leg as far
as
it can go. Once you get the first loop up high on the bird's leg,
you can apply a little bit of pressure to keep this first loop in place
by pulling the other loop around the bird's back. As you are
positioning
the transmitter/harness to insert the bird's second leg, keep the
transmitter
as high on the bird's back as you can; this will prevent the
transmitter
from falling off by sliding down over the bird's tail. The most
difficult
part is getting the second leg through the second loop without the
first
loop coming off the first leg. (If you have an assistant, get
them
to hold on to something to prevent this from happening!) I stick
the blunt-end through the second loop to get it over the bird's second
foot. I then slowly work the second loop upwards on the second
leg,
always checking that the transmitter is sitting up high on the bird's
back
(you have to make sure it's not sitting on top of the bird's
tail).
As with the first loop, you want to get the second loop as high as it
can
go on the bird's leg. Ideally, the "drumsticks" of the bird's
upper
legs will keep the loops up high so that your transmitter remains
firmly
in place.
When newly-tagged
birds
are released they are unsteady. Of the five females that I
radiotagged
in 1999, thee flew away fairly easily, although they all wobbled on
their
first perches as they learned to compensate for the added weight.
Two other females had initial difficulty gaining altitude and landed on
the ground after release. Within five minutes of release, both of
these females climbed trees by hopping up from branch to branch before
making their first big flight. All five females were tagged in
the
early- or mid-afternoon and all were behaving normally by
evening.
Because the added weight of the transmitter is obviously a stress to
the
tagged bird, I minimized other manipulations to my subjects prior to
attachment
(i.e. I just weighed them, put the transmitter on, and let them
go).
One must remember that even if a transmitter weighs only 5% of a bird's
weight, it is still stressful to the bird and steps should be taken to
minimize any ill effects. Be prepared to follow newly tagged
birds
and re-capture them if they are not responding well to the transmitter
or harness (I keep a butterfly net nearby when releasing tagged birds).
The figure-eight
leg
harness is very easy to remove. Slide a blunt end under the
elastic
(I usually go for the underneath, inside of the leg) and ease it down
over
the bird's "drumstick". The whole thing will fall off before you
can say "Please fall off, figure-eight leg harness."
|
|
References
Naef-Daenzer, B. 1993. A new
transmitter
for small animals and enhanced methods of home-range analysis. J.
Wild.
Manage
Naef-Daenzer, B. 1994.
Radiotracking
of great and blue tits: New tools to assess territoriality, home-rankge
use and resource distribution. Ardea
Rappole, J. H. & A. R. Tipton.
1991. New harness design for attachment of radio transmitters to small
passerines. Condor.
|

|
|
|

|
|